🏠 Home › Fundamentals › Footwork › Footwork: Ready Position
Footwork: Ready Position
Comprehensive unified tennis knowledge base — Fundamentals, Stroke Analysis, Reference Library, and more
Footwork: Ready Position
Michael Friedman

Start from a low ready position with a wide stance, learn when to split step, stay low with knees bent when moving to the ball and when recovering.
Ultimately the secret to great tennis is great footwork! Great footwork means the ability to move into position to hit the ball and then recover and be ready for the next shot. Great footwork will improve your reactions to the ball and how you well judge it. It will move you consistently into better position and improve your strokes. It will help you generate power from the ground and up through your body. Good footwork will provide the rhythm and timing of the point, and much, much more.
This may sound simple, but it takes work and discipline to develop. Tennis teachers teach the ready position in the first lesson to beginners, but may not emphasize it enough with every level of play. I find myself coming back to the ready position in almost every lesson. If students can make the first move correctly and get back into the ready position, they can make the first move to the next shot the same way. That consistency builds confidence.
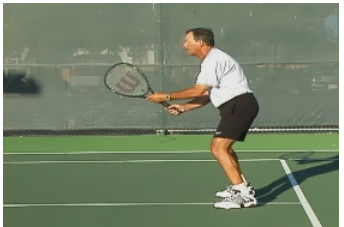
The starting point for developing great footwork is the correct ready position. This is the basic athletic position common to many sports with a low center of gravity and a wide stance.
There are physical, technical and mental elements to this ready position. This article focuses on the physical elements. You can read about the mental aspects in my first article in this series, entitled "Concentration". I'll address the technical elements in a later article as well.
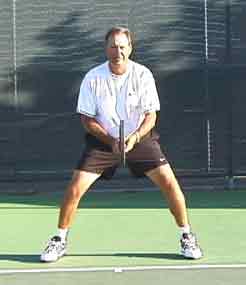
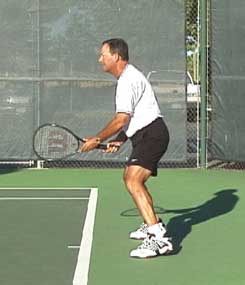
The starting point for developing great footwork is an athletic ready position with low center of gravity and wide stance, shown above in front and side views
Every ball you react to in tennis is slightly different from every other. By reacting out of the same ready position each time, making the same first move, you will develop muscle memory that will help you respond in the same fundamentally sound way to all different situations. And you can learn to do this automatically.
Players should begin getting ready, or establishing the ready position, when their opponent is hitting the ball. Most players tend to think about what they are doing only when they are hitting the ball themselves. In reality, you have to take the time to think about your ready position and challenge yourself to get back into it by the time your opponent is hitting the next shot.
Establishing the Ready Position
You can get into the ready position right now while you are reading this, and develop a feeling for the position. When you get on the court, stand one yard behind the baseline and do the same.
Widen your stance so that your feet are a little more than shoulder width apart. Now try to widen them a little more until you feel like they are too wide apart. This might be uncomfortable but it is probably correct. Feel like you are standing up straight. Your lower back is concave, that is, the small of your back is curved in towards your spine. Your shoulders are level and your head is facing forward.
Now bend your knees and reach down with your fingertips and touch the top of your kneecaps, while keeping your back straight. Feel how your weight has transferred to the balls of your feet and your toes. There should be no weight on your heels. Don't lift your heels, just keep the weight off of them. When you look down you should see your knees covering your toes.
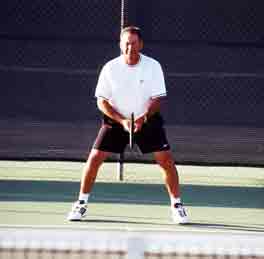
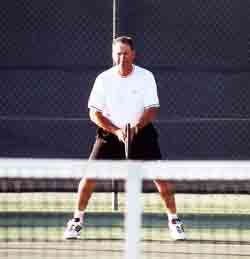
If you can see the intersection of the court and the back fence looking over the net, your ready position is too high
From the correct, low ready position, you are looking through the net to see the intersection of the court and the back fence
When you get to the court, establish this position and look up. You should be looking through the net to see where the court surface meets the back fence. If you are looking over the net to see this intersection, you're too high. Lower your position until you see the intersection of the court and the back fence through the net. This position should feel like you are guarding someone in basketball, or you're playing the linebacker position in football, or shortstop in baseball. This basic athletic position should be used in all ball sports.
Hold this low center of gravity position and move your feet in place for ten seconds like you are running as quickly as you can. Feel your quickness, agility and balance by keeping your feet apart and your knees bent. Experiment and see how quick and agile you are when you stand up straight with your feet together and again try to move your feet as quickly as you can again. You should be able to move your feet much faster when you are lower. When you bend your knees, widen your stance, and keep your back straight, you are creating leverage in your toes, feet, ankles, knees and hips.
Staying with this low center of gravity will allow you to move to the ball with your lower body while keeping your back or spine fairly vertical and straight. This will provide good balance and allow you to stroke the ball correctly, creating an elegant look! Knees bent and the back straight might remind you of Groucho Marks running around the court and that might be a good image for you to keep in mind if you can keep from laughing.
This position might sound simple but it is not easy! Keeping your knees bent means you are stressing your quadriceps, hamstrings, ankles, calves, and shins, plus your glutes, which together makeup the biggest muscle groups of your body. These muscles will demand a greater blood flow. You will definitely start to feel it in your heart rate and respiration. Try to stand in the correct ready position for a minute. You will feel it!
This is a much more physically demanding position, and that might be why you would rather stand up straight with your knees locked and rest a little when your partner or opponent is hitting. But remember, while the ball is in play there is no time to rest. Stay down into the ready position and be prepared to time your split step. You can rest between points, but not between shots!
If you start at this lower center of gravity with your knees bent, you will already be in a bent knee position for your strokes!
Your knees should always be bent and in your ready position, as you move to the ball, hit the ball, and recover back to the middle.
Watch closely next time you are at a baseball game. Every time the ball crosses the plate the entire infield does the split step? This alerts the infielder to be ready to move in any direction when the ball comes off the batter's bat. The same is true every time your opponent hits the ball. You are on defense, ready to react. The split step is timed so that your feet are separating three to four inches more than when you started. Your feet should touch down just as your opponent hits the ball. Time your split with his hit. Land low and on your toes, ready to shift your weight in the direction you see the ball coming off your opponent's racquet. This shift is also called the load.
You can see this best when watching tennis on television by looking at the pros' knees. See how the knee bends more toward the side the player is moving. Watch the returner getting ready for the serve. Great returners start with their feet far apart. They might start with their body bent forward from the waist, but just as the server gets ready to toss the ball they will stand up a little straighter but keep their feet apart. Then they split their feet apart even further, timed to the ball hitting the server's racquet.
The First Move on the Baseline
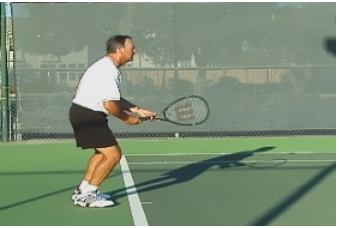
The first move to the ball on the forehand.
The first move is in the lower half of the body where the knees ankles and hips shift or load in the direction that they see the serve going. You will see many of the top players keep this shifting mechanism in motion by shifting side to side just before the server serves. If you anticipate and shift the wrong way, you can only hit a defensive return of serve. The first reflexive move is the key to preparing the body to turn to the side the ball is going. If the bottom half is shifting one way and the top half is turning the other, you are in big trouble.
The last detail in the first move is a slight lean of your top half, or shoulders, towards the net. If you are right handed and you are turning to the right for a forehand, you should drop your left shoulder towards the net. The bottom half of your body is shifting to the right and while the top half is turning to the right it is leaning to the left.
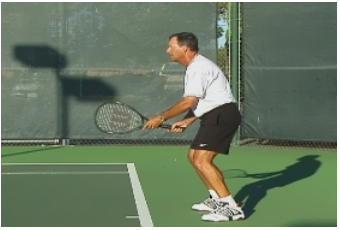
Here is the identical first move on the backhand side
To the backhand the right shoulder should be dipping towards the net. This lean is what prepares the body to be lined up when you step into the shot with your weight going towards the net.
Practice Drill
First try this without a ball. Start behind the baseline in the ready position. See the relationship of the top of the net to the back fence. Keep the bottom of the fence below the net throughout this drill. Do the split step, stay down and take three steps to your forehand, after you finish your swing get down and side step back to the middle of the court. If you saw the bottom of the fence move from below the net to above the net, your center of gravity was coming up.
Practice this without a ball to the backhand as well. Do it once to each side and then add repetitions. See how many you can do side to side. Do two or three forehands in a row and then two or three backhands in a row. Feel like you are playing a point without the ball. Then have your coach feed balls to you and see if you can maintain the same low center of gravity.
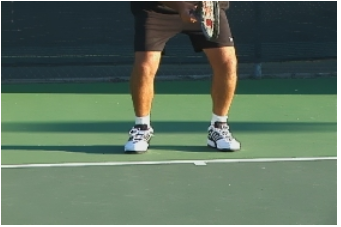
Here is the correct movement pattern to the ball and the recovery. Practice and see how many repetitions you can do, keeping your center of gravity low.
The First Move at the Net
Do this drill first without using a ball. Get into your ready position at the net. Do the split step. At the net when you do the split step, your feet should land slightly behind you so that your weight is leaning forward. This will force you to attack the ball.
Now shift or load your weight towards your forehand. Notice you have to step across after you shift your weight to hit the volley. Recover by stepping back with the same foot you stepped with and then split step again.
Note how the feet land behind you after the split step. This shows your weight is going forward.
The backhand pattern is the same. Shift or load your weight. Now step across to make the hit. Recover by stepping back and split step.
Now have your coach feed balls to you and time your split with the coach's hit. See the ball being hit by the coach's racquet and say the word "SPLIT" when he hits and get the timing of when to split.
Practice the ready position, the split step and the first move in front of a mirror and see what you look like making this move. It might feel strange to begin with, but it will look and work great!

Michael Friedman has been devoted to teaching and coaching tennis for over 30 years. Currently he is the Tennis Director at the Millennium Sports Club in Rancho Solano, where he runs an active junior development as well as adult program. Michael has been a mainstay in the United States Professional Tennis Association's Northern California Division, and served as President from 2000 through 2001. He has been a featured speaker at many USTA and USPTA tennis workshops throughout Northern California , specializing in teaching footwork and fundamentals to players as well as coaches. Michael was named USPTA Norcal Pro of the Year in 2003
Contact Moves: The Transfer | Footwork Home | Introduction: The 12 Golden Moves