You can learn to prepare for the volley in tennis in just two simple steps that will also teach you the correct volley technique.
Too many times, the technical instruction for the volley becomes too complicated, especially if you want to learn footwork and how to move your arms at the same time.
A lot of that can happen naturally if you just follow the right progression.
Step By Step Volley Preparation
Here’s a quick recap of what was in the video:
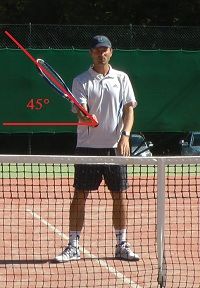
Step 1 - Prepare for the volley by opening your wrist by 45 degrees
1. Plant your feet shoulder-width apart and look for good balance. Try to feel the ground well.
In this volley drill, you won’t be moving your feet at first, so just find a good stable position.
2. Get the feel for the laidback wrist. As is often the case, we use the principle of exaggeration to help us really feel what’s going on.
In this case, you have to open your wrist to each side of the hand by 90 degrees.
Just let it drop to one side and to the other.
3. Now the goal is to find the optimal position of the wrist, which is roughly 45 degrees from the vertical.
Just allow your racquet to move from one side to the other with roughly a 45 degree angle on each side.

Step 2: Rotate your body by roughly 45 degrees and you're ready to hit the volley
4. Let’s start with the forehand side. Now open your wrist by 45 degrees and rotate your body so that the strings point toward the net.
You’ll see that you need to rotate roughly 45 degrees, too.
That’s because in the process of laying back your wrist and rotating your body, your hand will open up a little bit more again and it will point the racquet head straight towards the net.
From there, you’re ready to hit the volley.
5. Repeat the same process on the backhand side. First, separate step 1 – laying back your wrist – from step 2 – rotating your body, but eventually merge them together in a smooth way.
6. Keep practicing for a minute or two on the forehand and the backhand volley so that your body remembers better what it needs to do.
Once the ball starts coming towards you, there won’t be much time to observe what you’re doing.
7. When you start practicing with the ball, begin step 1 – laying back your wrist – first, and then have the ball fed to you.
8. Eventually wait for the volley in the ready position and react to the ball depending on which side it’s coming towards you.
How to play the ball on the volley and what your mental image should be is a topic for another article.
For now, just imagine that you want to play the ball gently, hit it slightly upwards, and apply slice on it.
You need to know how to play volley slowly first before you attempt faster ones.
In fact, if you play singles, there are many more volleys that you need to play with feel and guide them towards the target than there are volleys where you hit them hard and aim to finish the point.
So, in my view of the tennis volley, the foundation is playing the volley slightly upwards with slice. You build other types of volleys based on this foundation.
Let me know how this volley technique works for you the next time you’re on tennis court – or even in your living room – and we’ll work on the rest of the technique and feel in future articles.