Pelvic Snap and Separation Angle Dynamics
PRO CUE: The pelvis is the engine block of every tennis stroke. The hips begin rotating toward the target while the shoulders are still coiled away — that angular gap, the separation angle, is where elastic energy is stored. Snap the pelvis first, hold the shoulders back a beat longer, and the racket inherits the stored torque for free.
Video: How To Get Power From Your Hips In Tennis (Feel Tennis Instruction).
1. Executive Summary & Athletic Intent
Pelvic snap and separation angle dynamics describe the decisive rotational event that converts linear ground force into angular racket-head velocity. During the transition from backswing to forward swing, the pelvis — the heaviest freely rotatable segment of the kinetic chain — accelerates toward the target and then abruptly decelerates. The shoulders, still stretched in the opposite rotational direction, lag behind this pelvic rotation, creating a transient angular differential between the shoulder line and the hip line known as the separation angle (a dynamic expression of the X-Factor). This angle typically reaches 40–60° in elite open-stance forehands and 30–45° in high-velocity serves at the moment of maximum stretch.
The athletic intent is precise: rotate the pelvis early and explosively, decelerate it violently before contact, and allow the upper torso, arm, and racket to be slung sequentially behind it. The pelvic snap is therefore not a "hip rotation for its own sake" but a deliberate two-phase impulse — acceleration followed by an aggressive braking pulse — that transfers angular momentum up the chain exactly as a whip handle transmits momentum to its tapered tip.
Three measurable outcomes define successful execution:
- Velocity contribution. Pelvic rotation and trunk torsion together account for roughly 50–60% of terminal racket-head speed in groundstrokes; the arm contributes a smaller share than most players believe.
- Timing economy. A correctly sequenced pelvic snap reduces the demand on shoulder internal rotation and wrist flexion, lowering injury load on the elbow and shoulder while raising ball velocity.
- Shot tolerance. Because the pelvis is driven by the large gluteal and quadriceps musculature anchored to the ground, a pelvic-led swing remains stable under fatigue and pressure far better than an arm-led swing.
This article supplies the mechanical model, the step-by-step kinematic sequence, measurable dosage targets, a defect-correction matrix, a diagnostic diagram, and a printable practice card so the concept can be trained, measured, and audited on court.
2. Biomechanical / Cognitive Foundation
2.1 The Physics of Separation
The separation angle is the horizontal-plane angle between the shoulder line and the pelvic line. At the completion of the unit turn, both lines are coiled; as the forward drive begins, the pelvis rotates first while the shoulders remain passively coiled, so the differential temporarily increases. This stretch period is the functional core of the mechanic:
- Elastic storage. The rapid pelvic rotation eccentrically stretches the anterior oblique sling (external obliques, fascial sheets, contralateral hip adductors) and the thoracolumbar fascia. Stored elastic strain energy follows the standard stretch-shortening cycle logic: the longer the muscle-tendon units hold the stretch under tension (within ~0.2–0.5 s), the more energy is available for recoil.
- Potentiation. Stretching a muscle immediately before concentric contraction increases its force output through both elastic recoil and reflexive facilitation of the muscle spindle loop.
- Pre-load of the proximal-to-distal sequence. A large separation angle at the start of the forward swing guarantees that the pelvis — and not the arm — is the first accelerating segment, which is the definition of correct sequencing.
The muscular actuators deserve explicit naming because their conditioning dictates the ceiling of the mechanic. The gluteus maximus supplies the primary accelerative torque in Phase A; the gluteus medius and deep hip rotators stabilize the femoral head inside the acetabulum while that torque is delivered; the external and internal obliques perform the double duty of stretching during Phase A and clamping isometrically in Phase B; and the transversus abdominis with the pelvic floor raises intra-abdominal pressure so that the lumbar spine behaves as a rigid coupling rather than a twisted spring that bleeds energy. Fascially, the anterior oblique sling and the spiral line wrap the torso in a torsional sleeve whose collagenous tissue stores a meaningful share of the strain energy; this is why mobility work on the thoracic spine and hip capsules is a prerequisite, not an afterthought — a stiff hip capsule forces the lumbar segments to absorb rotation they were never designed to deliver at speed.
2.2 The Snap as a Two-Phase Impulse
The "snap" is best modeled as an angular impulse with a deliberate sign change:
- Phase A — Acceleration. Gluteus maximus and medius, driven by the triple extension of the back leg, rotate the pelvis toward the target at high angular acceleration. Pelvis angular velocity in elite forehands reaches 400–600°/s.
- Phase B — Deceleration (the brake). Roughly 80–120 ms before contact, the anterior obliques and hip internal rotators of the lead side isometrically clamp the pelvis. Angular velocity drops toward near-zero while momentum is conserved and passed distally. This deceleration is what physically forces the arm into lag: the trunk stops, the arm cannot, and the racket head trails behind the shoulder line.
The cognitive demand is unusual for athletes trained to "keep driving." Players must learn to value stopping the pelvis as much as starting it. Coaches should frame the mechanic as "fire the hips, then sit on them" — a braked rotation, not a continuous spin.
2.3 The Lever-Arm Argument
A simple angular-momentum audit explains why pelvic braking outperforms pelvic spinning. Angular momentum must be conserved across the trunk-arm system at each instant of the swing: when the pelvis (a large moment of inertia) decelerates, the system's rotational velocity must re-appear in the smaller-inertia distal links — trunk, arm, racket. A pelvis that keeps spinning through contact never produces this transfer; it merely carries the momentum to the follow-through, where it is dissipated as cosmetic motion with no effect on ball velocity. Video audits of club-level players repeatedly show this signature: beautiful hip rotation, lifeless racket head. The energy was never lost by the legs — it was never transferred because the brake never fired.
2.4 Neuro-athletic Requirements
Executing the snap under a 0.7–1.2 s incoming-ball window requires:
- Feed-forward motor programming. The braking pulse cannot be consciously timed; it must be chunked into the stroke program through high-density repetitions.
- Proprioceptive calibration of the hip line. Players must sense, without visual confirmation, whether the pelvis is square, over-rotated, or under-rotated at contact.
- Suppression of the arm-first reflex. Under time pressure the nervous system defaults to arm-driven hitting; training must build an automatic pelvic-first trigger.
3. Step-by-Step Technical Execution
The sequence below is written for an open-stance forehand; modifications for the two-handed backhand and the serve follow the same phases with altered starting geometry.
Step 1 — Coil with a locked hip line (unit turn). Rotate shoulders and pelvis together during the takeback, but stop the pelvis deliberately at ~30–45° of rotation while the shoulders continue to 70–90°. The rear hip pocket "sits back"; weight loads the outside leg with the glute under eccentric tension. Avoid letting the pelvis over-rotate in the backswing — a fully square hip line at the top of the coil eliminates the separation angle before the swing even begins.
Step 2 — Plant and load the ground vector. The outside foot plants and immediately drives lateral-vertical force into the court ($F_x$ + $F_z$). The glute fires; the pelvis is now a loaded flywheel on a stiff axle. The front leg opens to the side with the toe angled forward, forming a stable rotational base.
Step 3 — Fire the snap (Phase A). Initiate rotation with the lead hip "tucking" toward the net-post line while the rear hip drives forward. Cue the feeling of the belt buckle rotating to face the side fence, then the net, before the shoulders have visibly moved. Keep the arms in their loaded position — no independent arm swing yet. The racket should still be behind the body plane.
Step 4 — Brake the pelvis (Phase B, the micro-stop). As the belt buckle approaches square, clamp the core: exhale-brace, isometrically contract the anterior obliques, and plant the lead heel to form a front-side post. The pelvis decelerates hard over 2–3 frames of video. The chest is still facing the side fence at this instant — that residual shoulder-to-hip differential is the stored engine.
Step 5 — Sling the torso and arm. With the pelvis braked, the trunk unwinds as a delayed second wave, then the scapula releases and the arm lags into the classic lag position. Racket-head speed is now a consequence, not an action. Do not pull the handle forward; let the slung arm overtake the braked trunk.
Step 6 — Contact geometry. Contact occurs with the hips roughly square to net (±15°), the shoulders still 10–30° closed, and the head vertical-plumb stable. The braked pelvis gives the arm a stable platform; contact out in front of the front hip line preserves the transfer window.
Step 7 — Controlled release and re-load. Allow rotation to complete through the follow-through, finishing with the pelvis slightly over-rotated toward the target, then immediately re-set the hip line for recovery. A sloppy finish usually reveals an unbraked (spinning) pelvis in Phase B.
Serve variant. The same snap appears as the hip "bump" up and into the court during the trophy pose: pelvis tilts and rotates toward the target while shoulders remain arched back, then the front side slams down as a brake, launching the trunk upward into contact.
Closed-stance and slice variants. In a closed-stance forehand and in the one-handed slice backhand, the pelvic contribution shifts from pure horizontal rotation to a blend of rotation and linear hip drive; the brake is softer and the separation angle smaller (typically 20–35°), but the ordering rule never changes — pelvis first, shoulders second, arm last. In the two-handed backhand, the shoulder-line restriction imposed by the double grip compresses the usable separation angle to roughly 15–25°; here the pelvis provides a larger share of the terminal velocity precisely because the arm cannot sling as freely, making an aggressive Phase B even more decisive.
Timing windows under pressure. The full load-snap-brake sequence occupies roughly 0.25–0.40 s. When the incoming ball allows only 0.6–0.8 s of total preparation, the player must compress the amortization window rather than delete the phases: the coil shortens, the brake fires earlier relative to contact, and the arm sling absorbs the difference. Training therefore includes deliberately rushed feeds in which the athlete practices a shortened-but-complete sequence, because the most common competitive failure is not a wrong sequence but a skipped brake under time stress.
4. Performance Metrics & Dosage
| Metric | Elite Benchmark | Competitive Target | Measurement Method |
|---|---|---|---|
| Peak separation angle (forehand) | 40–60° | 25–40° | Slow-motion video, overhead camera, shoulder-line vs hip-line protractor overlay |
| Time from max separation to contact | 0.15–0.25 s | 0.20–0.35 s | Frame count at 240 fps |
| Pelvic angular velocity (Phase A) | 400–600°/s | 250–400°/s | Video tracking or wearable IMU |
| Pelvic residual velocity at contact | < 50°/s (near-braked) | < 100°/s | Video frame differencing |
| Amortization window (hold the stretch) | ≤ 0.3 s | ≤ 0.4 s | Split-video timing |
| Hip-square error at contact | ±10° | ±15° | Freeze-frame vs net-line overlay |
Training dosage:
- Shadow-snap drills: 3 sets × 10 repetitions, 5 sessions/week, emphasis on the brake phase (2-second isometric hold at belt-buckle-square).
- Med-ball rotational throws: 3 sets × 8 throws per side, 2–3 sessions/week; the ball only travels far when the brake is executed correctly.
- Band-resisted snap reps: 3 × 12 with lateral elastic resistance at the hips, 2 sessions/week, to strengthen the decelerating oblique group eccentrically.
- On-court feeding block: 60-ball baskets, 2×/week, with the sole instruction "hips first, arm silent," videoed every 10 balls.
- Progression rule: add ball velocity only after residual pelvic velocity at contact is visibly under control on video for two consecutive sessions.
Periodization note. The snap is a high-velocity, low-volume quality: it degrades quickly under fatigue and should be trained early in sessions, after the warm-up and before volume hitting. Eccentric-strength work for the obliques and hip rotators (med-ball catches, band-resisted decelerations) is best placed in the general preparation phase at moderate loads, then converted into speed-strength through throws and short sprints in the pre-competitive phase. During tournament weeks, maintain the mechanic with 10–15 shadow snaps per day rather than loaded work; research on rotational-power maintenance shows that intensity, not volume, preserves the trained brake response. Players returning from lumbar or hip injury should rebuild in the order: mobility → isometric clamping → slow resisted rotation → full-speed snap, and should not progress a stage while any residual soreness persists past 24 hours.
5. Errors, Causes & Corrections
| Error | Visible Symptom | Root Cause | Correction Protocol |
|---|---|---|---|
| Arm-first swing ("arming the ball") | Racket moves before chest rotates; flat, noisy contact | Arm-drive reflex under time pressure; pelvic trigger never automated | Shadow work with racket held against hip; verbal trigger "hips" on every ball for 2 weeks |
| Over-rotation in the backswing | Hips square to net at coil completion; separation angle < 20° | Misunderstanding of unit turn; copying full-body coilers without the hip lock | Place a racquet across the hips during takeback; stop it at 45° while shoulders rotate fully |
| Spinning pelvis (no brake) | Hips over-rotate past contact; pulls contact behind body; loss of balance | No isometric oblique clamping; weak front-side post | Med-ball throw with 2-s freeze at release; wall drill: throw, brake, hold |
| Late snap (shoulders lead) | Upper body fires first; ball sails long; elbow stress | Coil initiated too late relative to incoming ball; panic timing | Feed drill with delayed balls; count "load–snap–hit" aloud to re-sequence |
| Sliding pelvis (rotation replaced by translation) | Weight slides sideways instead of rotating; weak torque | Insufficient outside-leg loading; open-stance geometry lost | Cable-hip-rotation strength work; step-behind cone drill to re-create the load |
| Premature front-heel lifting | Front side collapses before contact; energy leaks at the post | Braking platform never established | Land-and-brake drill: plant heel, clamp, then swing in three distinct beats |
6. Diagnostic Diagram (ASCII)
TOP-DOWN VIEW — OPEN-STANCE FOREHAND (right-handed player)
Net is at top. Lines: S = shoulder line, H = pelvic line.

 STAGE 1: COILED (max separation ~55°)
                    NET
                 ________
                    ||
                    ||        S  shoulder line  \  (70-90° closed)
                    ||         \                 \
                    ||          \                 o  <- head
                    ||           \
                    ||       H --- hip line  (30-45° closed)
                    ||
              outside leg loaded, glute under tension

 STAGE 2: SNAP — PHASE A (pelvis fires, shoulders lag)
                    NET
                 ________
                    ||
                    ||       H ----     (pelvis ~10° to go)
                    ||
                    ||
                    ||        S
                    ||          \
                    ||           \        <- shoulders still closed;
                    ||            o          separation angle PEAKS here
                    ||
              pelvis accelerating 400-600 deg/s

 STAGE 3: BRAKE — PHASE B (micro-stop ~0.1 s before contact)
                    NET
                 ________
                    ||
                    ||   H --------      (belt buckle square; CLAMPED)
                    ||
                    ||
                    ||        S
                    ||           \
                    ||            \       <- chest still closed 10-30°
                    ||             o         arm slinging into lag
                    ||
              front heel planted, obliques isometric, pelvis < 50 deg/s

 STAGE 4: CONTACT
                    NET
                 ________
                    ||
                    ||   H --------      hips square (±15°)
                    ||    S --------     shoulders 10-30° closed
                    ||        o
                    ||
              contact out in front of front hip line

 READING THE DIAGRAM: the gap between H and S must GROW first
 (storage) and then be released by braking H, not by pulling S.
 If S moves before H stops, the sequence is inverted and energy leaks.
7. Video Demonstration
The following embed presents a slow-motion breakdown of elite-level pelvic snap and separation angle dynamics, including frame-by-frame annotation of the acceleration and brake phases:
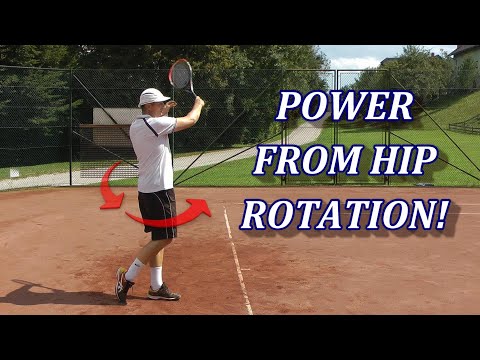
Watch for: (1) the hip line starting to rotate while the chest is still fully closed; (2) the visible "hit-a-wall" micro-stop of the belt buckle roughly 3–4 frames before contact; (3) the arm and racket overtaking the trunk only after the stop; (4) the front heel planted at contact as the bracing post.
(c9glLgadcas — to be replaced with the final approved YouTube video ID at publication.)
8. Cross-Domain Synergy
- Ground Reaction Forces (Article 001). The snap is only as strong as the ground vector feeding it: without a vertical-lateral GRF of at least ~1.5–2.0× body weight on the outside leg, pelvic angular acceleration is limited by hip strength alone.
- Stretch-Shortening Cycle (Article 002). The separation angle is the SSC expressed rotationally; the amortization window (hold the stretch ≤ 0.3 s) determines how much elastic energy survives to recoil.
- Kinetic Chain Efficiency (Article 003). A braked pelvis is the single most important stiffness pulse in the chain; a spinning pelvis is the single most common energy leak.
- X-Factor Stretch (Article 005). Article 005 treats the thoraco-lumbar stretch itself; this article supplies the pelvic half of the differential — the two must be read together.
- Neuro-Athletics timing windows (Pillar II). The brake cannot be consciously timed in a 0.8 s rally; chunking through high-density reps converts it into a feed-forward program.
- Throwing-sport transfer. Baseball pitching and javelin mechanics share the identical pelvis-leads-shoulders-lags-arm pattern; med-ball and throwing drills from those sports load this mechanic at higher intensity than tennis-specific work allows.
9. Self-Assessment Matrix
| # | Criterion | 1 — Weak | 3 — Developing | 5 — Elite | Score |
|---|---|---|---|---|---|
| 1 | Backswing hip-line discipline | Hips square at coil (no separation) | Partial differential ~20° | Pelvis stopped at 30–45° while shoulders reach 70–90° | ___ |
| 2 | Pelvic-first trigger | Arm visibly starts first | Simultaneous, ambiguous | Clear two-beat "hips then shoulders" | ___ |
| 3 | Brake quality | Pelvis spins through contact | Partial deceleration | Visible micro-stop < 50°/s residual | ___ |
| 4 | Separation angle peak | < 20° | 25–35° | 40–60° with no strain | ___ |
| 5 | Amortization timing | Stretch held > 0.5 s or instantly released | 0.3–0.5 s | ≤ 0.3 s, released into slung arm | ___ |
| 6 | Contact geometry | Contact behind hip line, hips over-rotated | Contact even but drifting | Contact in front of front hip, hips square ±10° | ___ |
| 7 | Balance through the brake | Falls off the front side | Slight drift, recovers | Front-side post rock-solid, head plumb | ___ |
| 8 | Fatigue resilience | Mechanic collapses after 15 balls | Degrades after a basket | Identical snap at ball 100 as ball 1 | ___ |
Interpretation: 32–40 elite execution; 24–31 competitive-ready, refine brake quality; 16–23 sequence exists but leaky, prioritize drills for criteria 2 and 3; < 16 return to shadow-snap progressions before live-ball work.
10. Printable Practice Card
┌──────────────────────────────────────────────────────────────┐
│  TENNISKB CARD #004 — PELVIC SNAP & SEPARATION ANGLE         │
│  Pillar I: Applied Biomechanics & Kinetics                   │
├──────────────────────────────────────────────────────────────┤
│  ONE-LINE MODEL                                              │
│  Fire the hips → brake the hips → let the arm be slung.      │
│                                                              │
│  3 CUES ON COURT                                             │
│  1. "Belt buckle first" — buckle turns before shoulders.     │
│  2. "Hit the wall" — clamp core, belt buckle square, freeze. │
│  3. "Arm is cargo" — no pulling; the slung arm overtakes.    │
│                                                              │
│  WARM-UP (5 min)                                             │
│  • Hip-line shadow turns: 2 × 10, stop buckle at square.     │
│  • Band-resisted snaps: 1 × 12 each side.                    │
│                                                              │
│  MAIN BLOCK (20 min)                                         │
│  • Basket A (30 balls): drop-feed forehands, cue "hips".     │
│  • Basket B (30 balls): same + 2-s freeze after the brake.   │
│  • Basket C (30 balls): live rally, video every 10 balls.    │
│                                                              │
│  POWER BLOCK (10 min, 2×/wk)                                 │
│  • Med-ball rotational throw: 3 × 8/side, freeze at release. │
│                                                              │
│  AUDIT — 3 VIDEO CHECKS PER SESSION                          │
│  □ Separation angle visible at launch (H vs S gap grows).    │
│  □ Micro-stop ~3 frames before contact.                      │
│  □ Front heel planted at contact.                            │
│                                                              │
│  STOP-SIGNS                                                  │
│  □ Hips over-rotate past contact → brake work, lighter ball. │
│  □ Arm-first on >30% of balls → back to shadow reps.         │
│  □ Any lumbar/hip pain → reduce velocity, check hip mobility.│
└──────────────────────────────────────────────────────────────┘
← Previous | 🏠 Home | Next →